Tuesday, July 15, 2014

Miniature Beach Scene in a Bottle

Summer is here - time to bask in the glorious sun! I recently made a trip out to the beach and found many a treasure in the sand. But what to do with it? The answer: recreate your day in the sun using the beach itself! Now you never have to leave home to enjoy the seashore.

Materials:
  • Jar or bottle
  • Sand
  • Shells
  • Popsicle stick
  • Marker
  • White glue
Step 1: Combing the Beach

On your next trip out to the beach, take a moment to scan the sand. Chances are there are cool shells and other such treasures all around you. I found this really awesome crab shell, sand dollar, and a couple of other shells that tickled my fancy. Resist the urge to take all of these neat finds, as the bottle only has so much room in it for decorating!

Next, you need to collect some sand. I actually used some colored sand that I had, but it would also be a really good idea to take some of the sand from the beach you are recreating on a miniature scale. The choice is yours!

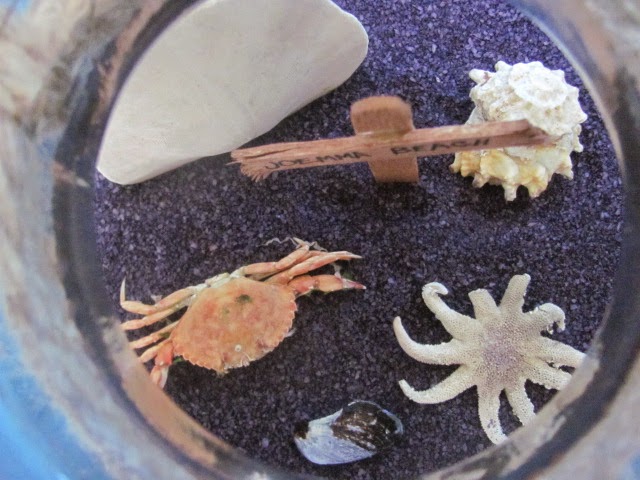
Step 2: Creating A Mini Scene

 Now that you have collected all of your treasures, fill up your bottle or jar with sand until it looks just right to you. Once the sand is in, you can cut the popsicle stick into two pieces. One piece should be longer to act as the sign post, and the other shorter for the actual sign. Write the name of your beach on the shorter piece and then glue it to the longer popsicle stick piece.

While this is drying, begin arranging your shells in your bottle. While deciding what went into the bottle, I realized that sometimes less is more (I warned you to resist the urge to collect all shells in sight!!). Once your arrangement is complete - I took a loooooong time to decide what went where - you can stick your beach sign into the sand. Make sure there is enough sand to hold up the popsicle stick sign, or it might fall over.

Ta daaaaaa! Your custom beach in a bottle is complete. Now all that's left is to find the perfect place for it and enjoy the view.


Thursday, June 26, 2014

Summers In Bloom: Painting A Terra Cotta Pot

    
     Now that the weather seems to be warming up here, I am in the planting spirit. I found some unique succulents - Living Stones! - and decided the terra cotta pot they would live in was just too plain. In about two days, I created a customized "Gossip Stone" terra cotta pot that I really enjoy.


Materials:
  • Terra cotta pot and saucer
  • Fine grained sandpaper
  • Acrylic paint
  • Sponge brush
  • Acrylic sealer
  • Optional: stencil and stencil adhesive for design


Step 1: You want to begin by sanding down the terra cotta pot to remove any obstructions from its surface and to allow the paint to adhere better. My pot, in particular, came from a thrift store and had some flaky patches and some old adhesive on it. Rinse the pot out and let it dry completely. I didn't do this with the saucer, as it was in pretty good shape.

Step 2: Now you can paint the base coat. I used Ultra Deep Blue. Depending on the color, you may need to add multiple coats of paint. For the shade of blue I used, I ended up using 3 coats of paint. For the inside of the pot, you only have to go down a couple of inches, as the soil will cover the rest of the pot. Allow adequate drying time between coats. If you are impatient like me and waiting for paint to dry is excruciating, now would be a good time to paint the saucer.


Step 3: Now comes the fun part - wait, we weren't already having fun?! - painting your design. I chose to do a Legend of Zelda, Gossip Stone pot as I had already chosen cute "Living Stone" plants I came across one day at Home Depot. Print out a design on white paper and tape it to your blank stencil. Then simply cut out the stencil with a craft knife. Another option is to use patterned stencils or simply freehand a design (I am not a good enough artist to attempt this yet!!!!). Spray the back of your awesome new stencil with stencil adhesive and apply it to the pot, being mindful that the pot is round and your stencil flat. Then paint in your design.
 

For the lip of the pot, I paraphrased a Gossip Stone quote from The Ocarina of Time: The magical stone speaks but its words are secret. It fits in so well!!!!

Step 4: At long last!! We can seal the pot; two coats on the inside and two on the outside. Dido for the saucer. Voila! We have an awesomely unique pot that even Link wouldn't dare pick up and throw!!

Secret Step 5: Because I always get out of control when crafting, I went outside and found a rock that resembled the shape of a Gossip Stone. Using a black artist pen, I drew on the face design. Now my little stone plants can grow in a proper home!


Monday, November 4, 2013

Humpty Dumpty Sat On A Wall

For my sister's baby shower, we picked nursery rhymes as a theme. Little did we know we would have the hardest time finding decorations in stores. We didn't want to budge on the theme, so I had a go at designing decorations and centerpieces. Something that I treasured the most was the Humpty Dumpty scene I made to place near prizes to give out to guests. I think this could be used for any number of reasons (Humpty is now sitting on a shelf in my niece's nursery, and I kept the stone wall!) I hope you enjoy this as much as I did designing and realizing it!


Materials for Humpty's Wall and Base:
  • Two Rice-A-Roni boxes
  • Newspaper strips, flour, and water for mache paste
  • Piece of cardboard for base
  • Faux vines from craft store
  • Faux flowers from craft store
  • Grass
  • Hot Glue
  • White glue
  • Green, black, grey, white, and dark brown paint

Materials for Humpty:
  • Wooden oval from craft store (I got mine from Michaels)
  • Scraps of felt (I used black for shoes and shorts and white for hands)
  • White pipe cleaner
  • Ribbon
  • Small button
  • Embroidery thread
  • White and black paint
Step 1: The Great Wall

Start by gathering two empty Rice-A-Roni boxes. You could also use any box you think would make a good wall. This will serve as the mold for the wall. The measurements for the Rice-A-Roni boxes are roughly 11"LX1"WX6.25"H when combined. Hot glue them together at their sides, and your wall mold is formed.

Next, paper mache a couple of layers of newspaper all around the boxes. I boil water and flour to create my paper mache paste. You could, instead, cover the boxes in white paper to reduce wait time, but I liked that the paper mache hardened when it dried and reinforced the "wall." When this is completely dry, you can paint the wall entirely white. Now we can paint in the "stones."

Step 2: Detailing the Wall

Painting stones in is a little tedious, but the final appearance is worth it. Begin by penciling in stone shapes on all sides of the wall except for the bottom. Leave small gaps between each so that you can paint in "mortar" in gray. Once all of the stones are drawn in, paint the spaces between them with grey.

To detail the stones, water down a little black paint. Dip a paintbrush in the watery black and blot it on a paper towel until the paint appears very faint. Lightly paint different spots on the stone. Repeat this again with a dark brown paint and again in black. The stone wall is complete!

Step 3: Adding Greenery

To create a grassy base, grab a cardboard box and cut out a round shape. Paint the entire top green. Once the paint dries, place the wall in the center and trace around the bottom edges. Then set aside the wall. No grass will be added to this section.

Pour white school glue all around your base, except where you traced your wall. Then simply add grass until the cardboard is covered up.

To finish off the wall, take some plastic vines and hot glue them on the left side. Make them long enough so that they can creep around the side of the wall and maybe even on the top. Add some flowers to different spots on the vines. Finally, glue down the wall to the grassy base using hot glue. On to Humtpy!!


Step 4: Humpty Dumpty Himself!

Take the wooden oval shape and measure it all the way around. You will use this measurement to help make his clothes. Once you have the number, you can paint the oval white. Paint another coat if the wood can still be seen through the paint. While the paint dries, you can begin working on his outfit.

I dressed my Humpty in black shorts made out of felt material. Allow for a 1/4" seam. I didn't use a pattern here. I just cut out two "shorts" shapes and sewed them together. I stitched around the waist with purple embroidery thread for decoration. Finally, I sewed on a purple button in the center of the waist. Glue Humpty inside of his shorts.

Arm (right), leg (left)
To add the pipe cleaner arms and legs, cut down a white pipe cleaner to a length that looks proportional to Humpty's eggshell body and attach them with hot glue. When gluing, you may want to bend the tips of the pipe cleaner. This will give you a greater surface area to be glued to the body and create a stronger bond. In the picture, the leg is on the left with the "foot" at the bottom, and the arm is on the right with the "shoulder" at the top. After adding the arms, I also glued on purple ribbon "overalls" to complete his outfit.

For his hands, cut out two glove-type shapes out of white felt material and glue one to each arm. Using black felt material for the shoes, cut out two small elliptical shapes for the soles and four boot sides. You can also cut out a white "foot" like you did for the hands and glue them to the legs. Since these pieces were so small, I hot glued them together instead of sewing. Glue or sew two boot sides together from 1-2 and them from 3-4. Finally, you can attach them to the boot sole and then on Humpty's foot.

Now all that is left to do is paint Humpty's face (my Humpty is surprised).  Now Humpty Dumpty is ready to sit on his wall. Hopefully you will be able to put him together again should he fall, using this tutorial.

Here are the other nursery rhyme decorations from the shower! I added a scroll with the nursery rhyme written out for each scene.


The Woman in the Shoe


The Dish and the Spoon


Little Miss Muffet


Monday, October 21, 2013

It's a Circus in Here! Circus Birthday Centerpieces

My niece's first birthday was in September and we threw her a vintage circus themed party. One of the cutest outcomes of the decorating frenzy were the table centerpieces. You may notice the second centerpiece from the left has a number one. Here I will only address how to make the silhouette centerpiece. You will love these centerpieces and all of your guests will want to take one home with them!


Materials:
  • Popcorn containers (these circus themed boxes were found at Michaels)
  • Circus silhouettes from The Graphics Fairy
  • Graphic 45 Le Cirque scrapbook paper
  • Patterned scrapbook paper, for backs of silhouettes
  • Striped plastic bendy straws
  • Floral foam
  • Lollipops
  • Crinkle Paper Shreds (I found mine at the dollar store)
  • Hot glue
  • Glue stick
  • Scissors and X-acto Knife

Step 1: Assembling the Images

Choose your images or silhouettes (I got my silhouettes from the Graphics Fairy) and print them out. Cut out the images using an X-acto knife. After the silhouettes are all cut out, you may want to trace around the edges with a black marker. This is done to cover up any white paper edges that may be showing.

Once the silhouettes are ready, you can paste them onto the patterned scrapbook paper you have chosen. Finally, cut the patterned paper by following the contours of the silhouettes. Choose some images to cut out from the Graphic 45 Le Cirque paper and cut these out as well.

While you are cutting out all of your circus images, you can start warming up your hot glue gun so you don't drive yourself crazy waiting for it to heat up up like I always do! When all images are cut, you can attach them to a striped straw. Cut a small slit at the top of the straws. This is where the images will be sitting. But first! put a little bit of hot glue inside the straw - near the slits - and then insert your image. When all straws are attached you can set everything aside for final assembly.


Step 2: Lollipops

The lollipops that I used had a big label that covered most of the swirled pattern of the candy. If your candy does too, simply unwrap the lollipops and replace with clear saran wrap. This way the candy stays clean and you can see all the colors and swirls.
 
Now that you have your candy prepared, pick out some of the "stamps" from the Graphic 45 circus pack. Glue one stamp to the front of each lollipop. Now we are ready to put it all together!

 A note about the lollipops: The candy I chose ended up being a little heavy for the centerpiece and, as a result, tipped over several times. You can buy a smaller lollipop (Which I couldn't find anywhere!!! But I digress...) or put something heavy at the bottom of the popcorn container when you piece it all together to prevent this from happening.


Step 3: Piecing the Puzzle Together

Glue a good sized piece of floral foam in each popcorn container. My piece went up about halfway through the container. Place the silhouette in the back/center by sticking the straw into the foam. You may need to trim the straw down, depending on the size of you container and image. The lollipops will go in the middle on either side of the silhouette, and finally, the scrapbook image will go in the front.

Finish it off by adding the crinkled paper shreds as filler.


TAAADAAA! Now your centerpieces are complete and you can sit back and enjoy the compliments!


Tuesday, October 15, 2013

Just In Time For Halloween: Decorative Coffin Boxes

I have made these cute wooden coffins for the past two Halloweens. These are great for decorations, to fill with candy and give out to friends and family, or for getting into the Halloween spirit. They are easy to make and will not put a strain on your wallet. If you would like to follow my design, I list the paint colors I use in the instructions, or you can create your own fun coffins and skeletons!

Vampiress in Coffin

Materials:
  • wooden coffin from craft store (I found mine at Michaels)
  • paint (I use acrylic paints)
  • felt material for lining the coffin (optional)
  • plastic skeletons
  • small piece of yarn (if adding hair to the skeleton)
  • fabric scraps (if adding clothes to the skeleton)
  • varnish (I use Delta Ceramcoat Matte Varnish)
  • fine sand paper
  • hot glue and white glue

Step 1: Preparing the Coffin

Unscrew the hinges and latches from the coffin so that sanding, painting, and creating is easier. We will put them back together at the very end. Sand down the coffin with fine sand paper to get rid of any flaking wood and to make painting easier. Once this is done, you can quickly dust off the coffin and get ready for painting (sorry my cutting mat is a little dirty, but it is well loved!!).


Step 2: Painting and Detailing the Coffin

Paint the coffin with the color of your choice. I chose Apple Barrel Black Craft Paint. You will want to put at least two coats of paint on. If you plan on adding felt material to the insides, you do not have to paint the inside of the coffin. I like to paint the top edges of the interior to ensure that no wood shows after I add the fabric.


Once the paint has dried, you can add a little detail. I added lines around the edges of the coffin with Apple Barrel Country Grey. After this is done, you can then apply two coats of varnish and let dry.


Another cute detail is to add embellishments to the outside of the coffin. Here I have added a cross to the lid.

Step 3: Lining the Coffin with Fabric

Now that the coffin is completely dry, you can measure the insides of the coffin. I have found that the easiest way to do this is to use a vinyl measuring tape, the kind used for sewing. Once this is done, you can cut out the pieces of felt material. I am using grey felt for this design.


When the pieces are all cut out, you can glue them down with a hot glue gun. Now you can reattach the hinges and the latch.

Step 4: Creating the Skeleton

Whenever I design a coffin, I usually have a character and a story that goes with it. If you couldn't find a skeleton (mine came from the dollar store in a pack of four skeletons) or if you just wanted to decorate the coffin, a great idea is to fill the coffin with Halloween candy or any other number of items (my mom uses hers to carry around some gems she uses as Bingo markers!).

One detail that really makes the skeletons come to life - so to speak - is by adding wisps of hair using yarn. I like using white yarn or a grey/black yarn. Simply cut a piece of yarn to your desired length. I usually cut the yarn several inches long. Pull the yarn apart until it begins to look thin and hair-like.Dab some white school glue on the skeleton's head and begin to place the wisps of yarn

 While this is drying you can begin to make clothes for the skeleton if you wish. This is a great use for the fabric scraps that you can not bear to throw away! When I make pants, or dresses, or shirts for the skeleton, I cut out a general shape for that item and sew it together.

Do not worry if it looks uneven or if the stitching is not perfect; once it is on the skeleton it will look as though it has been buried for a while and will really make the whole craft pop. Try and make the clothes a little loose fitting (I always eyeball this process, but it might be a good idea to place the skeleton on the fabric before cutting and sewing) so that you will have an easy time putting the clothes on.


To really give her the appearance of a vampiress, I cut the pointy end of a wooden skewer and stuck it where her heart would be. Now we know how this vampiress came to be a skeleton!

Now the skeleton is complete! You can place him or her in the coffin and display for everyone to enjoy! For more fun and spooky skeletons, you can visit my Etsy store: Ersatz Emporium


HAPPY HALLOWEEN!!